CS2 Buy Binds Generator | CS SAMURAI
Use our CS2 Buy Binds Generator to bind keys to quickly purchase any number of items at the start of your Counter-Strike rounds.
Select a key by clicking any of the key icons, then add items to bind to that key. After you've added item(s) to that key, you can optionally select another key to create additional binds.
The code for your binds will automatically be generated under "Your Generated Buy Binds." To implement the binds, copy this code and paste it into your CS2 autoexec file.
In CS2, items must be equipped in your loadout for buy binds to work! If an item in your bind is not equipped in your loadout, it will not be purchased.
You can read here for more details on how to use this tool and enable the binds you create here in CS2.
Numpad
Function Keys
Navigation Keys
Your Generated Buy Binds:
Select a Key Above
Rifles
Pistols
Grenades
Equipment
SMGs
Shotguns
Machine Guns
How to Make CS2 Buy Binds With This Tool
To create a bind:
- Click on a key in the "Numpad", "Function Keys", or "Navigation Keys" section of this page.
- Once a key is selected, you can click on the item(s) you want buy with that key.
Items must be equipped in your loadout in CS2 for the generated buy binds to work.
If you want to create multiple buy binds with different keys, you can select another key and then add the items you want to buy with that key. You can repeat this for as many buy binds as you wish to create.
You can edit a buy bind at any time by selecting the key again and clicking items to add or remove.
As you create binds, they'll show in the "Your Generated Buy Binds" section between the keys buttons and the items list.
When you're done creating your buy binds, click the "Copy Binds to Clipboard" button.
Buy Binds Generator Tips
Item Order
If you're creating a bind that buys multiple items, they will be purchased in the order you add them. If you make a bind that purchases an AK47 and Kevlar in that order, it will first try to purchase the AK47, then the Kevlar. If you don't have enough money to afford both items, it would first purchase the AK47, then fail to buy the Kevlar.
For this reason, we recommend adding items to your bind in order of importance. For example, you may want to add a smoke grenade before an HE grenade, as a smoke is a more crucial purchase.
CT/T Variants
CS2 has items that can only be purchased on T side or CT sides. However, you can make buy binds that purchase the equivalent weapon for either side.
For example, you can bind an AK47 and a M4A4 purchase to the same key. That key will then purchase whichever of the two options is available, depending on which side you're on.
Adding Binds to Your CS2 autoexec.cfg File
To implement the binds, copy and paste them into your autoexec.cfg file or create an autoexec.cfg file in your CS2 cfg folder.
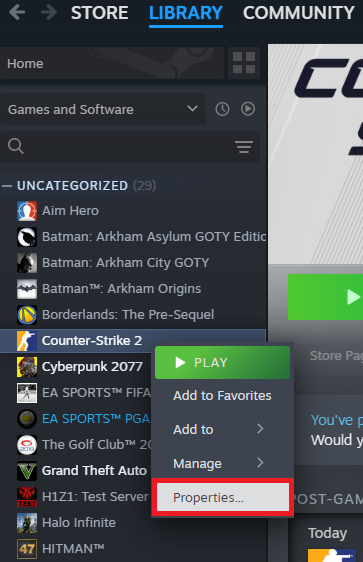
To locate your CS2 cfg folder, right-click "Counter-Strike 2" in your Steam library and click "Properties..."
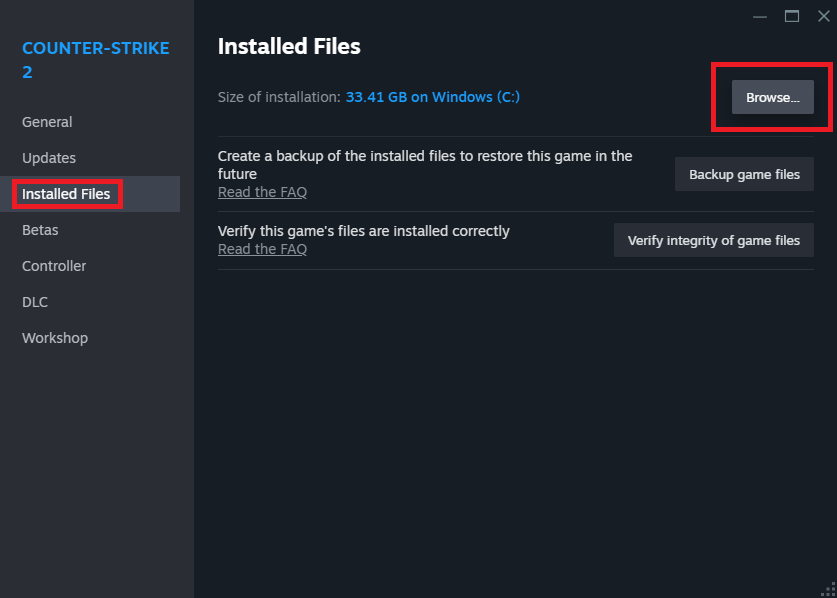
Next, click the "Installed Files" tab and click the "Browse" button.
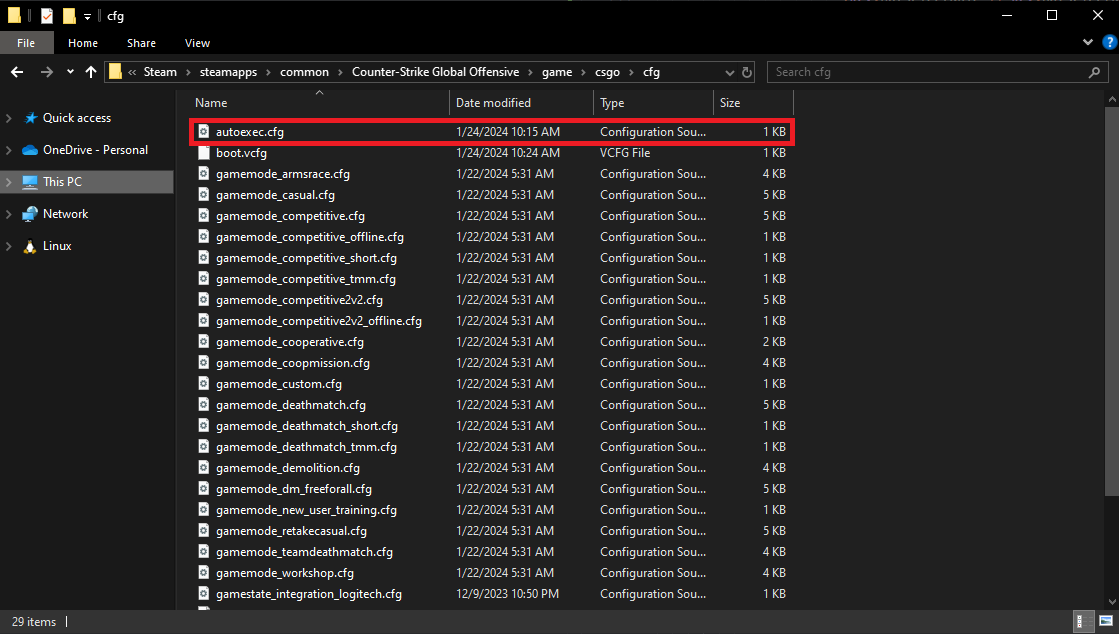
A file explorer window will open at "[...Some Other Folders]\Counter-Strike Global Offensive"
From there, double-click the "game" folder, then double-click the "csgo" folder, and then double-click the "cfg" folder.
If there's already a file called "autoexec.cfg" in this folder, paste your binds into it and save it.
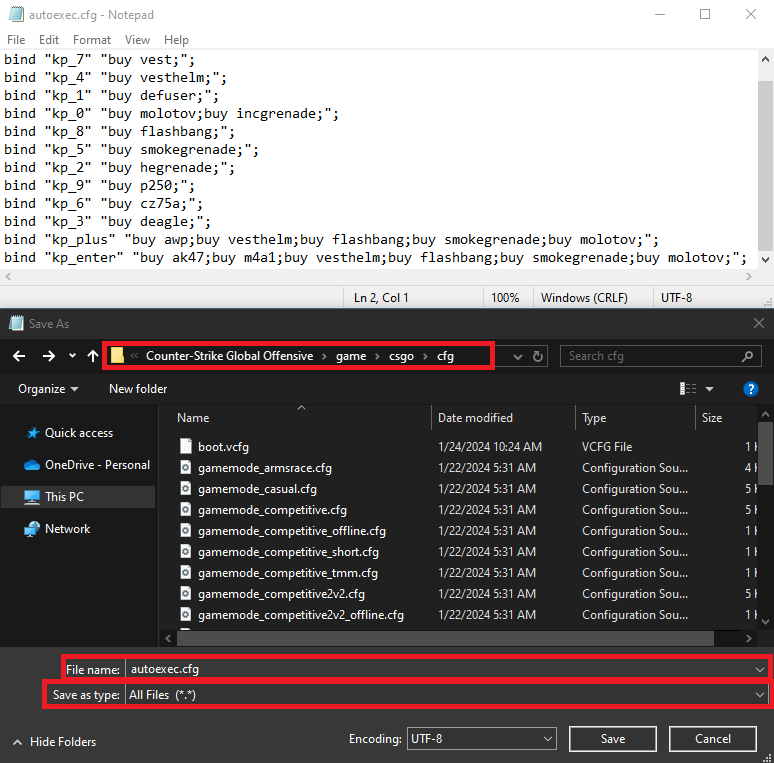
If there is NOT an "autoexec.cfg" file in your CS2 cfg folder, open a text editor (like Notepad). Then, copy and paste your binds in the text editor.
Save the file as "autoexec.cfg" in your CS2 cfg folder. Be sure to select "All Files" in the "Save as type" dropdown.
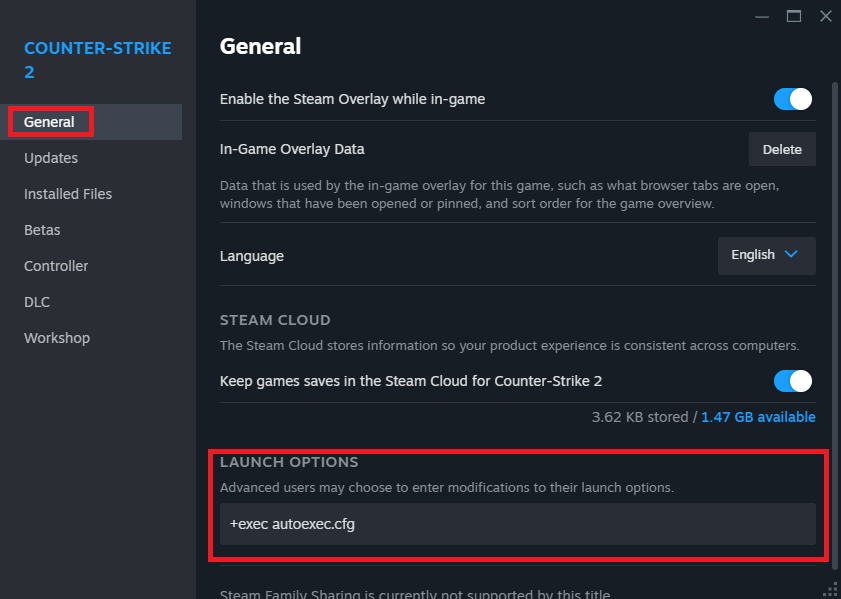
In order for the binds to work every time you load your game, you'll need to edit your CS2 launch options.
Like before, right-click "Counter-Strike 2" in your Steam library and click "Properties...". Under the "General" tab in the popup, add "+exec autoexec.cfg" in the "Launch Options" field.
This launch option command enables your binds by executing the bind commands in your autoexec file every time you launch CS2.
If you already have CS2 open, you'll need to relaunch it or run the command "exec autoexec" in the CS2 developer console. If the developer console is enabled in your CS2 settings, you can open it with the tilde "~" key.